
Tämän asennuksen suorittamiseen tarvitaan järjestelmänvalvojan oikeudet kassatyöasemaan. Jos sinulla ei ole niitä, ota yhteyttä omaan IT-tukesi tai Solteqin asiakastukeen. Yhdistä maksupääte sähköpistokkeeseen ja kassatyöasemaan ennen kun otat yhteyttä tukipalveluun.
Avaa portti 6001
-
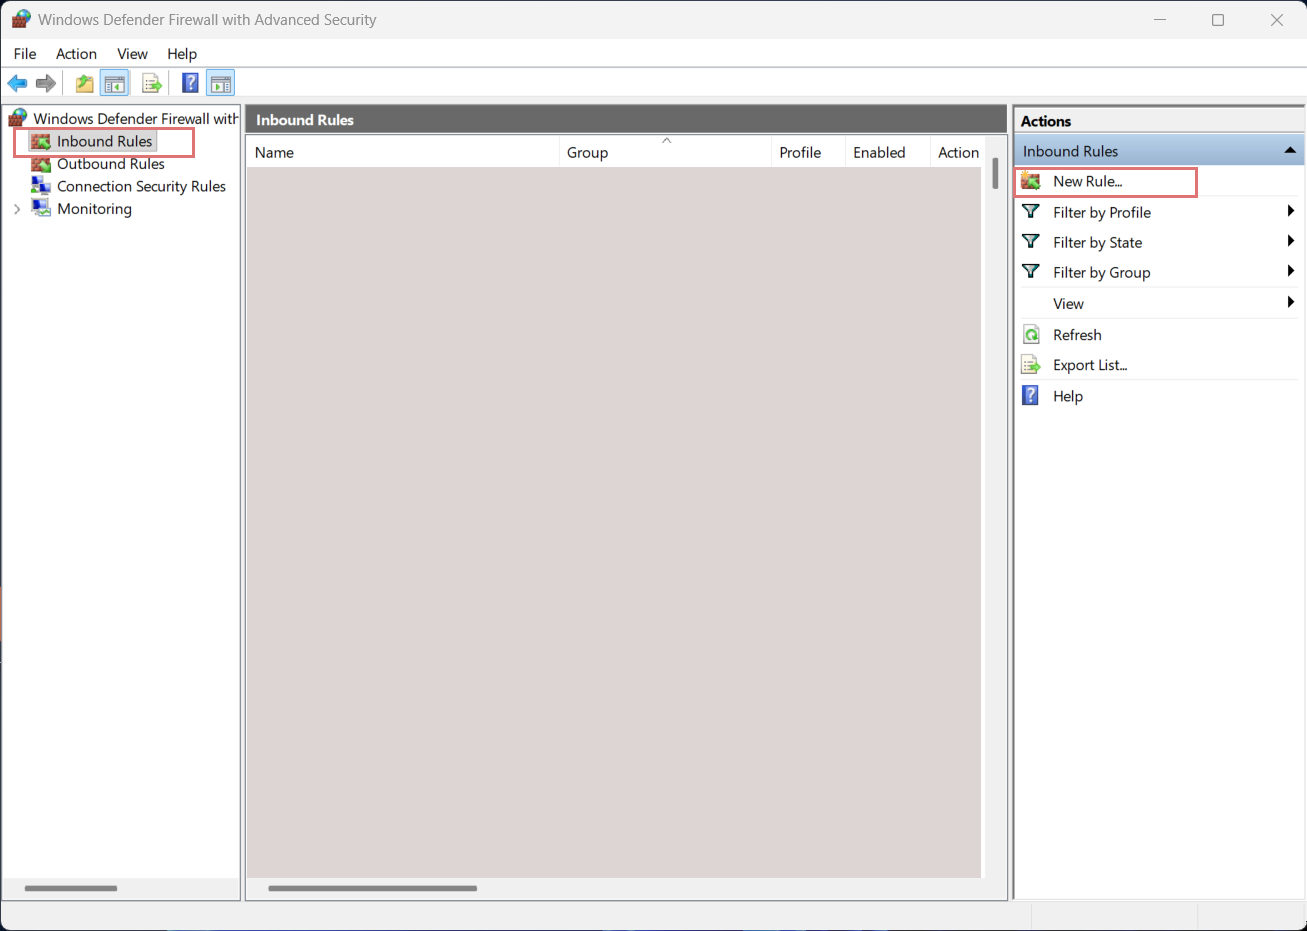
Avaa Windows Defender Firewall with Advanced Security järjestelmänvalvojan käyttöoikeuksilla.
-
Klikkaa Inbound Rules -kohtaa ikkunan vasemmalla puolella, ja sitten New Rule -kohtaa sen oikealta puolella.
Windows Defender Firewall with Advanced Security -
Määritä New Inbound Rule Wizard -ikkunassa seuraavat asetukset:
-
Rule Type: Valitse Port ja klikkaa Next >.
-
Protocol and Ports: valitse TCP ja sitten Specific local ports. Syötä kenttään 6001 ja klikkaa Next >.
-
Action: valitse Allow This Connection ja klikkaa Next >.
-
Profile: klikkaa seuraavat valintaruudut aktiivisiksi:
-
[✓] Domain
-
[✓] Private
-
[✓] Public
Klikkaa sitten Next >.
-
-
Name: syötä haluamasi nimi (esimerkiksi Nets-maksupääte).
-
-
Viimeistele asetusten määrittäminen klikkaamalla lopuksi Finish.
Maksupäätteen kytkeminen kassatyöasemaan
-
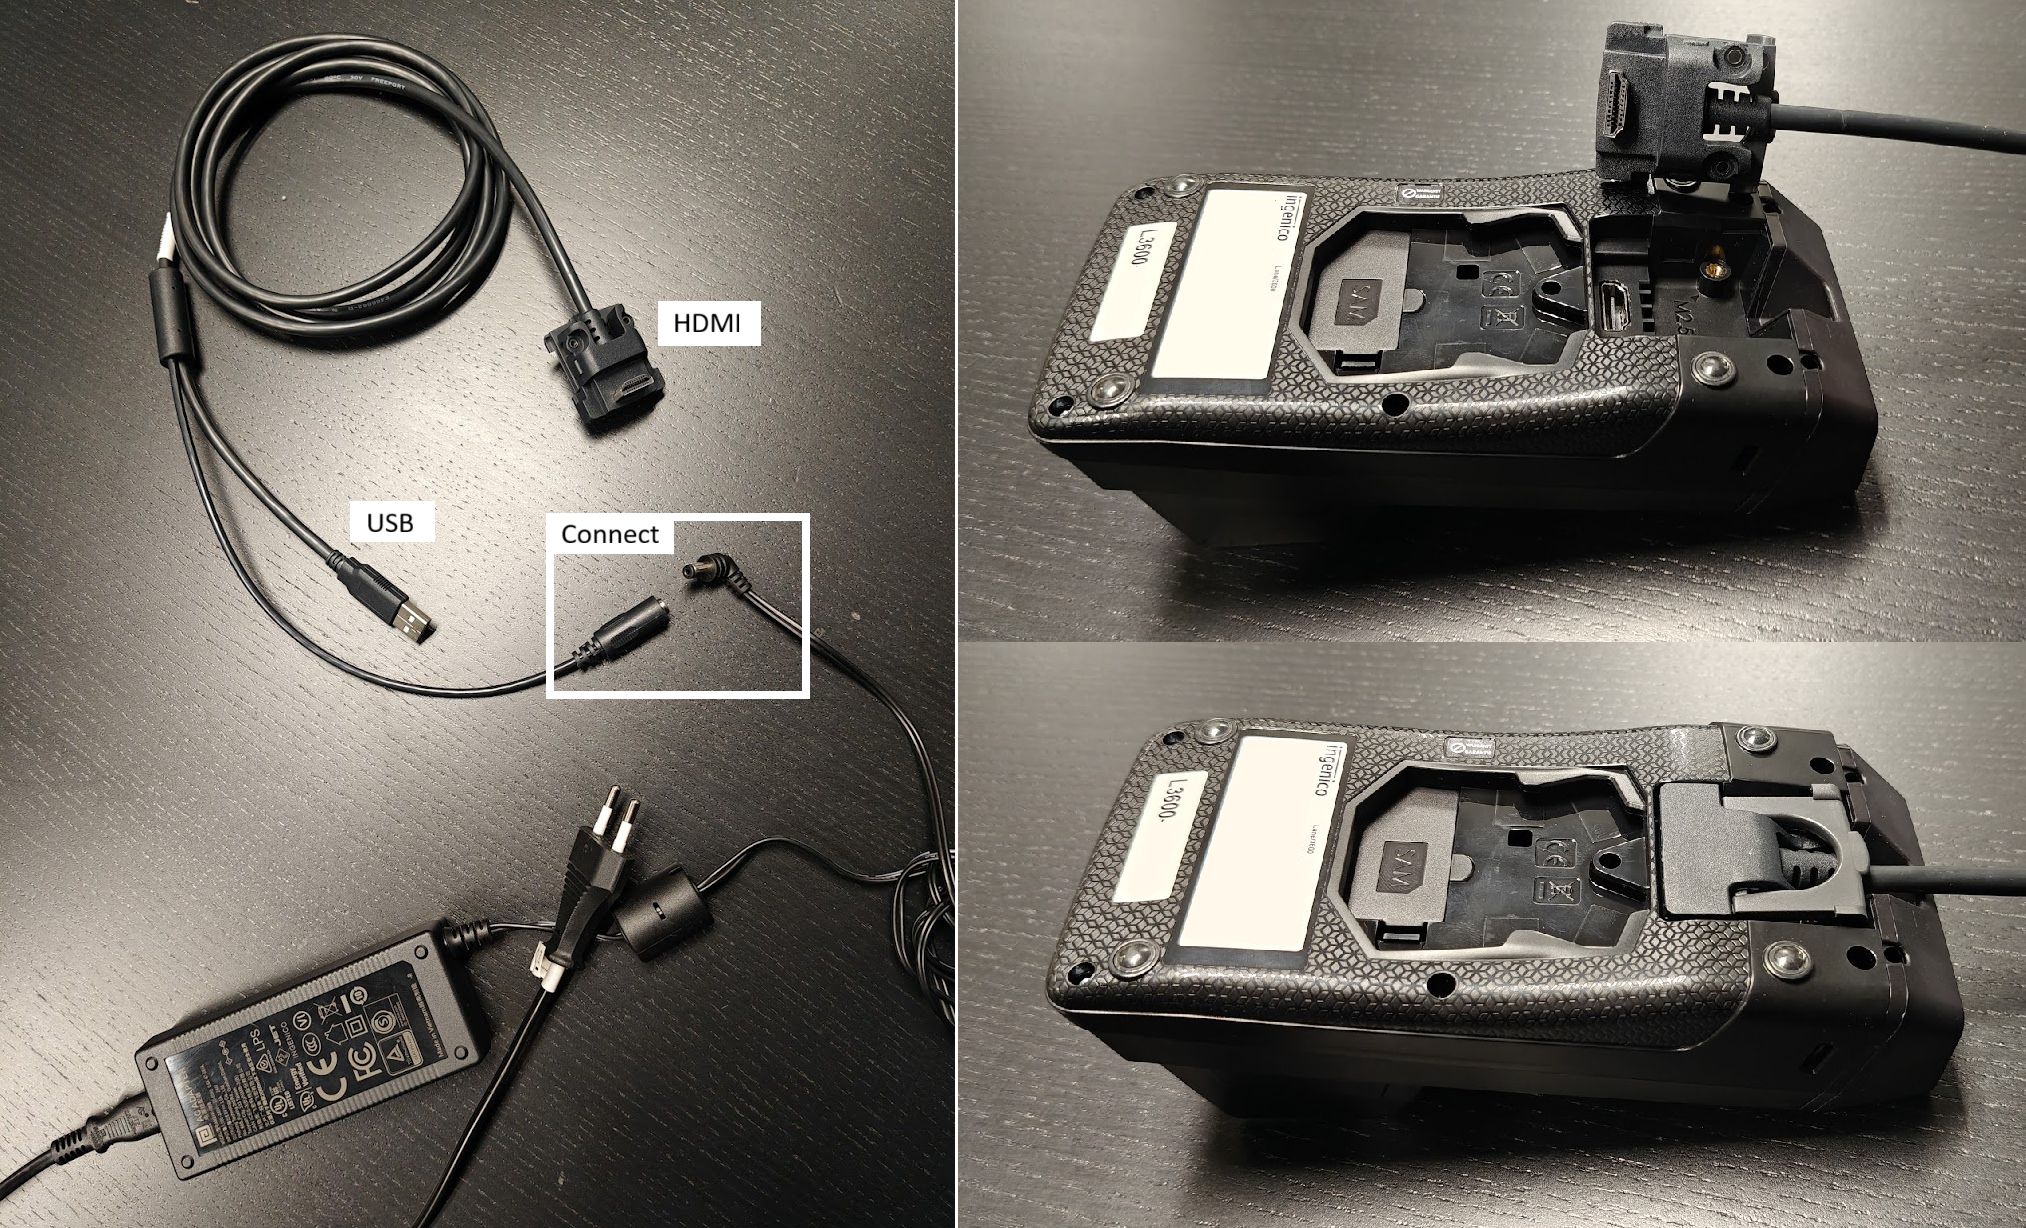
Yhdistä kaksi johtoa toisiinsa (kts. vasemmanpuoleinen kuva).
-
Kytke laitteen virtajohto pistorasiaan, USB-kaapeli kassatyöasemaan ja HDMI-kaapeli maksupäätteeseen (kts. oikeanpuoleinen kuva). Maksupääte käynnistyy automaattisesti, kun se on kytketty pistorasiaan.
Ajurien asentaminen
-
Pura v3.36.zip -tiedosto.
-
Suorita IngenicoUSBDrivers_3.36_setup_SIGNED.exe järjestelmänvalvojana.
-
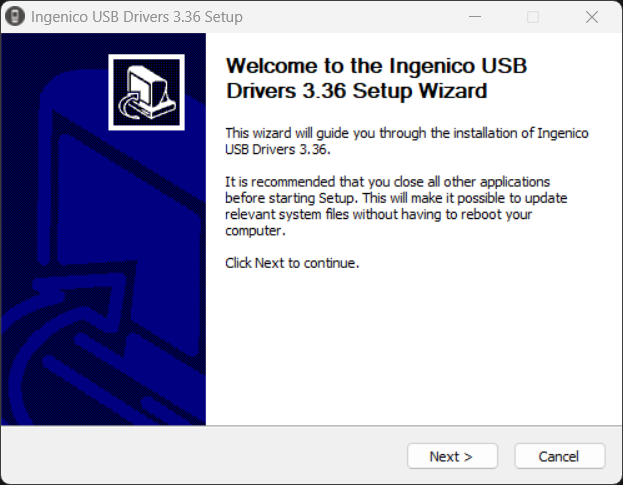
Ingenico USB Drivers 3.36 Setup Wizard -ikkuna avautuu. Klikkaa Next >.
Ingenico USB Drivers 3.36 Setup Wizard -
Choose Install Location -sivu tulee näkyviin. Jos haluat valita kansion, johon ajuri asennetaan, klikkaa Browse ja valitse kansio; muussa tapauksessa voit hyväksyä ohjelman ehdottaman oletuskansion klikkaamalla Next >.
-
Usb Driver Parameters -sivu tulee näkyviin.
-
Klikkaa [✓] Force COM Port Feature enabled -valintaruutu aktiiviseksi
-
Valitse vapaa COM-portti:
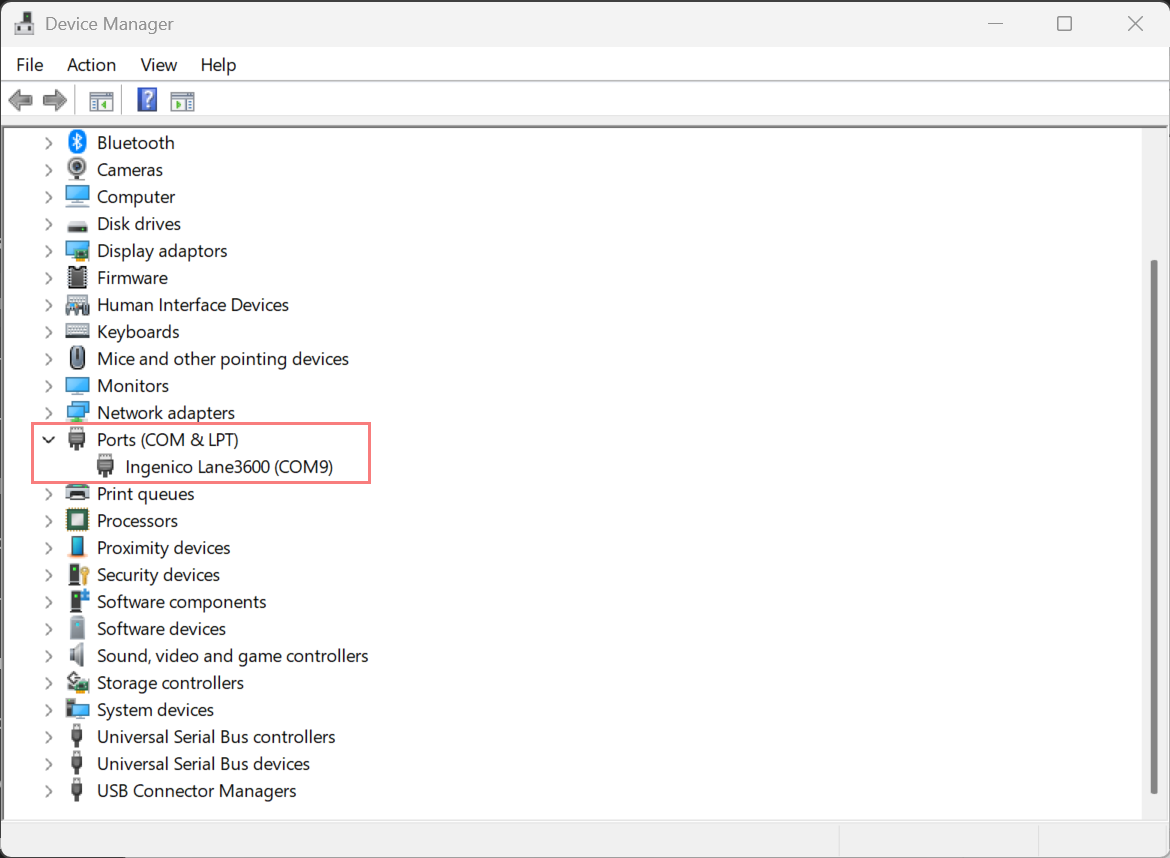
Voit nähdä varatut portit Device Managerissa:-
Klikkaa Windows-kuvaketta tehtäväpalkissa ja valitse Device Manager.
-
Klikkaa oikealle osoittavaa nuolta > Ports (COM & LPT) nähdäksesi varatut COM -portit.
Valitse COM-portti joka ei ole tällä hetkellä varattu, ja syötä sen numero (samaan kohtaan kuin 9 alla olevassa kuvassa).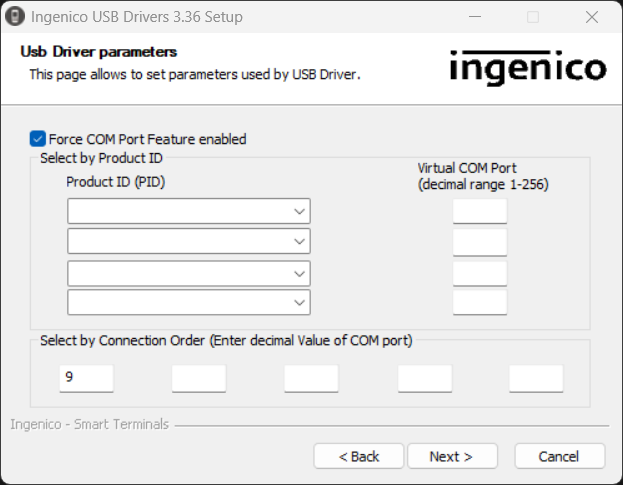
-
-
-
Advanced parameters -sivu tulee näkyviin. Klikkaa Next >.
-
Choose Start Menu Folder -sivu tulee näkyviin. Klikkaa Next >.
-
Completing the Ingenico USB Drivers 3.36 Setup Wizard -sivu tulee näkyviin. Klikkaa Next >.
-
Kun ajuri on asennettu onnistuneesti, Ingenico Lane3600 tulee näkyviin Device Manageriin, valitun portin kohdalle.
Asetusten määrittäminen taustapalvelussa
-
Mene taustapalvelussa Asetuksiin ja valitse työasema, jota haluat käyttää maksupäätteen kanssa.
-
Mene työaseman Payment Service -asetuksiin ja klikkaa Uusi -kuvaketta.
-
Valitse/syötä maksupäätteelle seuraavat asetukset:
-
Nimi: Kortti
-
Tyyppi: NETSBaxi
-
Asetukset: Liitä alla oleva [BAXI] -teksti kenttään.
Huom: sinun tulee muuttaa ComPort-numero rivillä 20 vastaamaan Ingenico Lane 3600 -laitteelle asetettua porttia.[BAXI] LogFilePrefix=baxilog LogFilePath=C:\baxi\logfiles # Tracelevel valid values: # 0 - LOG_NEVER, no logging whatsoever, logfile not created. # 1 - LOG_ERR, Only errors are logged # 2 - LOG_TRACE, errors and trace # 3 - LOG_DEBUG, errors, trace and debug # 4 - LOG_ALWAYS, all logging is enabled TraceLevel=4 LogAutoDeleteDays=14 SerialDriver=Nets #SerialDriver=Microsoft# File used to store reconcilliation data #ReconcilliationReportFile=C:\baxi\logfiles\baxireconcilliation.log [TERMINAL] BaudRate=57600 # If ComPort is set to 0, this means that only DeviceString will be # used to find a port. This means that if ComPort is 0, DeviceString # must be filled in, or you get an Open reject reason of 7416 (PROPERTY_DEVICE_STRING) ComPort=9 # If DeviceString is set, BAXI will first attempt a normal open on # the com port indicated. If BAXI fails to open this com port, it will # not indicate an error yet, but look for any COM port in the system # that contains the DeviceString in its name. If one or more of such # com ports are found, BAXI will attempt to open them one by one. # If open succeeds on one of them, it will assume that the terminal # is on that port and continue on that port. If none of the ports # succeed with an open, BAXI reports an error. After this, BAXI monitors # the com port for removal and insertion. One can insert into any usb # port and obtain a new com port number. BAXI will detect this and open # the corresponding port to keep communications towards the terminal without # having to restart BAXI. # If DeviceString is not set, BAXI only monitors the removal/insertion # of the com port number indicated in ComPort. #DeviceString="SAGEM MONETEL USB Telium" DeviceString="SAGEM Telium" #DeviceString="Ingenico iST1xx" # Checks if the attached terminal has rebooted and gives a warning PowerCycleCheck=0 # Checks if the attached terminal has changed terminal id. Locks Baxi if TID mismatch! TidSupervision=0 [HOST] HostPort=9670 #Production VPN #HostIpAddress=193.214.20.211 # Production Secure access HostIpAddress=91.102.24.142 #Test host #HostIpAddress=91.102.24.111 [MSGROUTER] MsgRouterOn=0 MsgRouterIpAddress=127.0.0.1 MsgRouterPort=6000 [DEVICEATTRIBUTES] # VendorInfoExtended can be max 32 characters long. All four delimiters are mandatory. VendorInfoExtended="BBS;Retail;02.13.01;57807343803;" # CutterSupport = 0 means no cutter support. # Any other value = cutter support # Nb length of this field is 1 byte, should be set from ECR CutterSupport=1 #printerwidth should be set from ECR PrinterWidth=24 #Displaywidth should be set from ECR DisplayWidth=20 #IndicateEotTransaction is used to send the flag OP3 in Device Attribute. # 1 = makes the Local Mode to set a flag for Offline Transactions IndicateEotTransaction=1 #autoGetCustomerInfo is used to enable automatic Customer Info retreival in the terminal. AutoGetCustomerInfo=0 #TerminalReady is used to signal that the terminal is reday for a new transaction TerminalReady=0 #DisplayTextID will enable the Display Text with Unique Text ID UseDisplayTextID=0 #UseExtendedLocalMode will enable ExtendedLocalMode UseExtendedLocalMode=1 AlwaysUseTotalAmountInExtendedLM=1 # UseJoinDisplayText will enable splitting Terminal lines into separate DisplayTexts UseSplitDisplayText=0 # Use2KBuffer will enable 2k receive buffer in Baxi. Use2KBuffer=0 # DisplayTextInLocalMode enables displaytext messages in localmode DisplayTextInLocalMode=0 [TCPIPSERVER] BluetoothTunnel=0 SocketListener=0 SocketListenerPort=6001 -
Laita Maksuväline käytössä ja Päämaksutapa -kytkimet päälle.
Lisätietoja Payment Service -asetuksista löydät sivulta Payment Service -asetukset.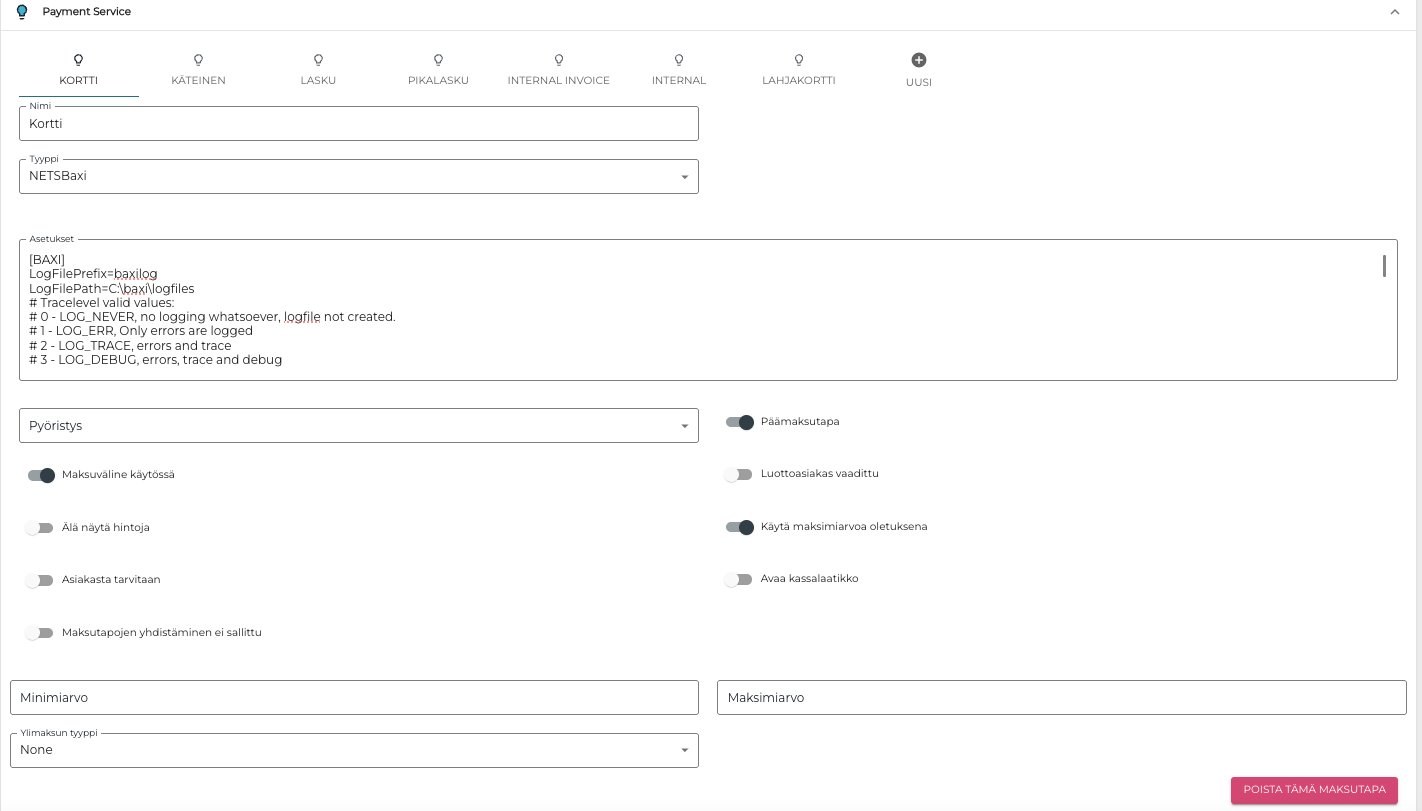
Payment Service -asetukset
-
-
Tallenna lopuksi asetukset klikkaamalla Tallenna.