
This installation requires Administrator privileges on the POS workstation. If you do not have them, please contact your IT support or Solteq Support. Connect the terminal to an electrical outlet and to the POS workstation before contacting support.
Open Port 6001
-
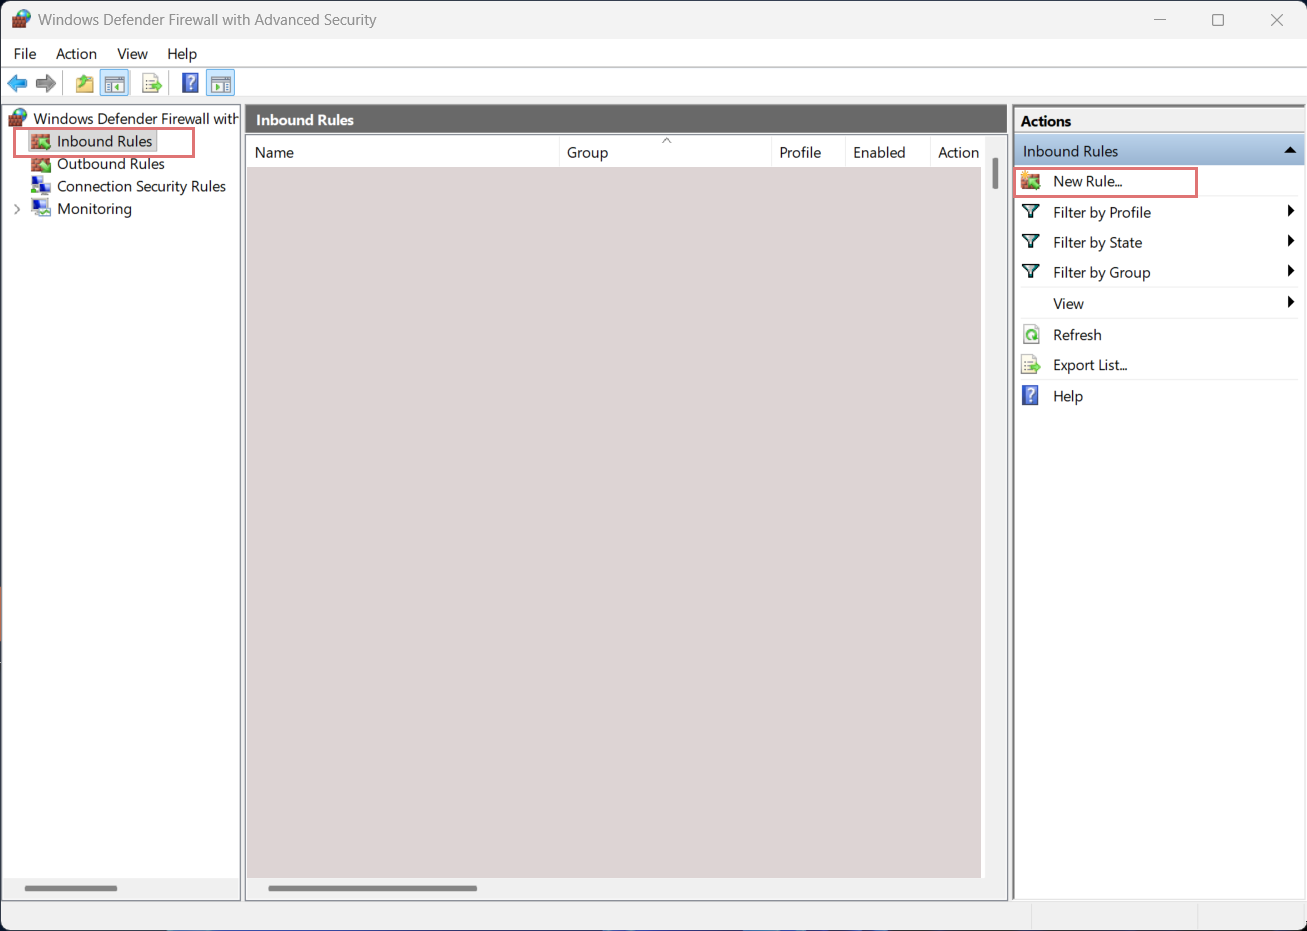
Open Windows Defender Firewall with Advanced Security as Administrator.
-
Click Inbound Rules on the left and New Rule on the right.
Windows Defender Firewall with Advanced Security -
In the New Inbound Rule Wizard, add the following settings:
-
Rule Type: Select Port and click Next >.
-
Protocol and Ports: Select TCP and then Specific local ports. Enter 6001 into the field, and click Next >.
-
Action: Select Allow This Connection and click Next >.
-
Profile: Select the the following checkboxes:
-
[✓] Domain
-
[✓] Private
-
[✓] Public
Then click Next >.
-
-
Name: Enter the desired name, for example: Nets Payment Terminal.
-
-
Click Finish to finish the setup.
Connect the Terminal to the POS Workstation
-
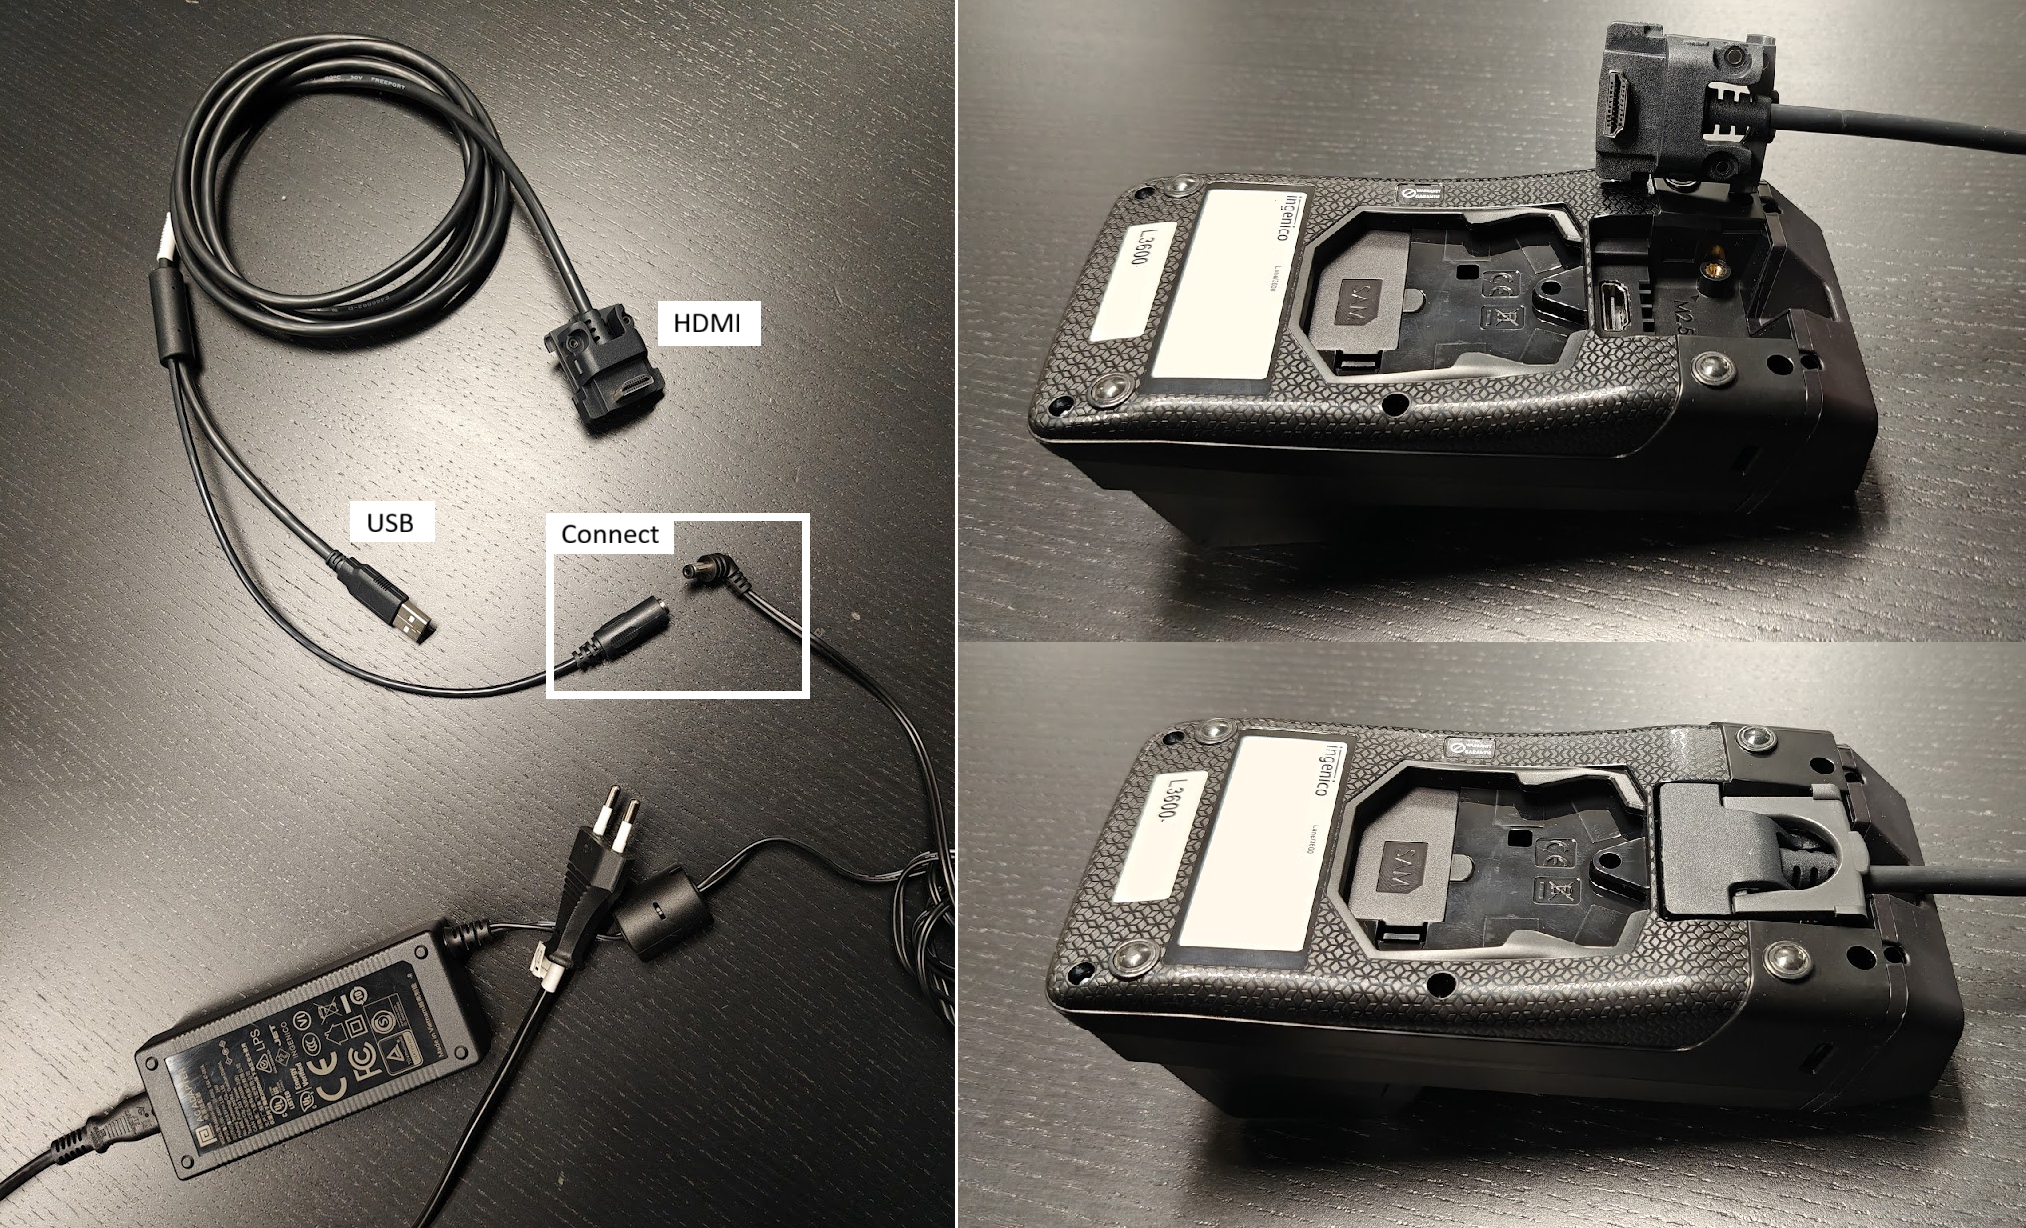
Connect the two cords together (see the image on the left).
-
Connect the power cable to the electrical socket, the USB cable to the POS workstation, and the HDMI cable to the payment terminal (see the image on the right). The terminal powers up automatically when connected to an electric outlet
Install the Drivers
-
Download the Ingenico Driver Installer v3.36
-
Unzip the file v3.36.zip
-
Run IngenicoUSBDrivers_3.36_setup_SIGNED.exe as Administrator.
-
The Ingenico USB Drivers 3.36 Setup Wizard window is displayed. Click Next >.

Ingenico USB Drivers 3.36 Setup Wizard -
The Choose Install Location page is displayed. To install the driver to a specific location, click Browse to search and select the location; otherwise just click Next > to accept the specified default location.
-
The Usb Driver Parameters page is displayed.
-
Click the [✓] Force COM Port Feature enabled checkbox to active.
-
Select a COM port that isn’t currently occupied.
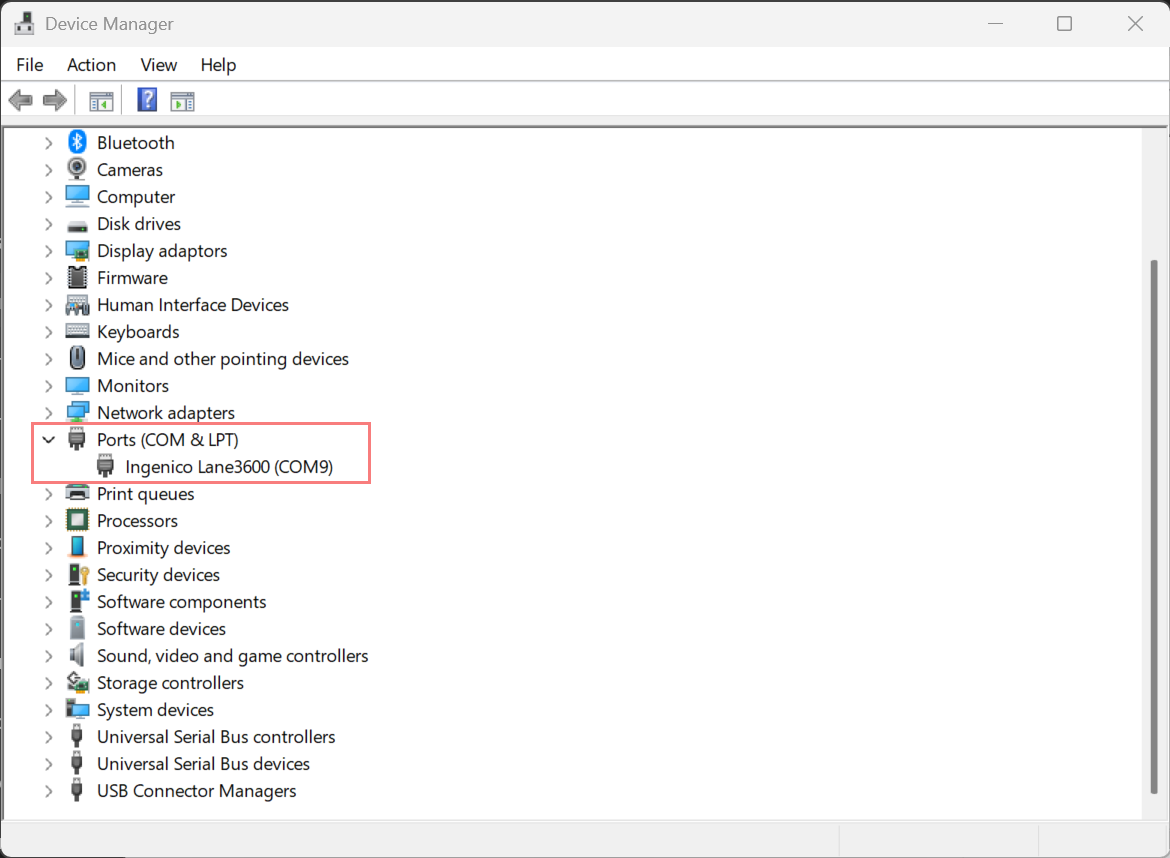
You can see the occupied ports in the Device Manager:-
Right-click on the Windows icon in the Task Bar and select Device Manager.
-
Click on the right pointing arrow > Ports (COM & LPT) to see the occupied COM ports.
Pick a COM port number that is not currently occupied and enter it at the position of the 9 in the example screenshot.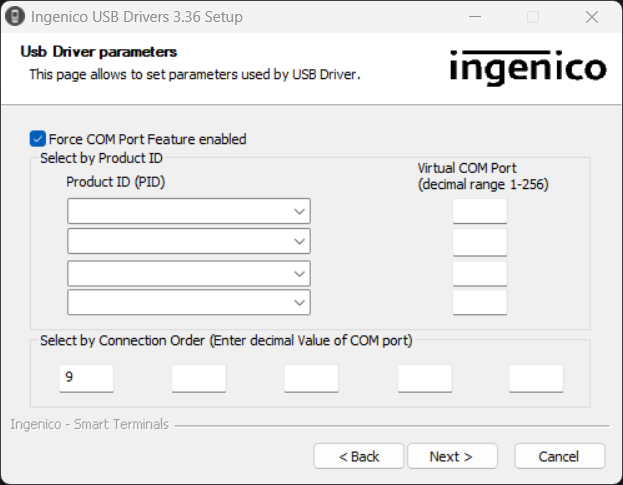
USB Driver Parameters
-
-
-
The Advanced parameters page is displayed. Click Next >.
-
The Choose Start Menu Folder page is displayed. Click Next >.
-
The Completing the Ingenico USB Drivers 3.36 Setup Wizard page is displayed. Click Next >.
-
When the driver has been installed correctly, Ingenico Lane3600 is visible in the Device Manager, on the selected COM port.
Configure Back Office Settings
-
Go to Configurations and select the workstation you want to use with the payment terminal.
-
Go to the workstation’s Payment Service Settings. and click the +New icon.
-
Select/enter the following information for the terminal:
-
Name: Card
-
Type: NETSBaxi
-
Configuration: Insert the [BAXI] text below.
Note: You need to change the ComPort number on line 20 to match Ingenico Lane3600’s current COM Port.[BAXI] LogFilePrefix=baxilog LogFilePath=C:\baxi\logfiles # Tracelevel valid values: # 0 - LOG_NEVER, no logging whatsoever, logfile not created. # 1 - LOG_ERR, Only errors are logged # 2 - LOG_TRACE, errors and trace # 3 - LOG_DEBUG, errors, trace and debug # 4 - LOG_ALWAYS, all logging is enabled TraceLevel=4 LogAutoDeleteDays=14 SerialDriver=Nets #SerialDriver=Microsoft# File used to store reconcilliation data #ReconcilliationReportFile=C:\baxi\logfiles\baxireconcilliation.log [TERMINAL] BaudRate=57600 # If ComPort is set to 0, this means that only DeviceString will be # used to find a port. This means that if ComPort is 0, DeviceString # must be filled in, or you get an Open reject reason of 7416 (PROPERTY_DEVICE_STRING) ComPort=9 # If DeviceString is set, BAXI will first attempt a normal open on # the com port indicated. If BAXI fails to open this com port, it will # not indicate an error yet, but look for any COM port in the system # that contains the DeviceString in its name. If one or more of such # com ports are found, BAXI will attempt to open them one by one. # If open succeeds on one of them, it will assume that the terminal # is on that port and continue on that port. If none of the ports # succeed with an open, BAXI reports an error. After this, BAXI monitors # the com port for removal and insertion. One can insert into any usb # port and obtain a new com port number. BAXI will detect this and open # the corresponding port to keep communications towards the terminal without # having to restart BAXI. # If DeviceString is not set, BAXI only monitors the removal/insertion # of the com port number indicated in ComPort. #DeviceString="SAGEM MONETEL USB Telium" DeviceString="SAGEM Telium" #DeviceString="Ingenico iST1xx" # Checks if the attached terminal has rebooted and gives a warning PowerCycleCheck=0 # Checks if the attached terminal has changed terminal id. Locks Baxi if TID mismatch! TidSupervision=0 [HOST] HostPort=9670 #Production VPN #HostIpAddress=193.214.20.211 # Production Secure access HostIpAddress=91.102.24.142 #Test host #HostIpAddress=91.102.24.111 [MSGROUTER] MsgRouterOn=0 MsgRouterIpAddress=127.0.0.1 MsgRouterPort=6000 [DEVICEATTRIBUTES] # VendorInfoExtended can be max 32 characters long. All four delimiters are mandatory. VendorInfoExtended="BBS;Retail;02.13.01;57807343803;" # CutterSupport = 0 means no cutter support. # Any other value = cutter support # Nb length of this field is 1 byte, should be set from ECR CutterSupport=1 #printerwidth should be set from ECR PrinterWidth=24 #Displaywidth should be set from ECR DisplayWidth=20 #IndicateEotTransaction is used to send the flag OP3 in Device Attribute. # 1 = makes the Local Mode to set a flag for Offline Transactions IndicateEotTransaction=1 #autoGetCustomerInfo is used to enable automatic Customer Info retreival in the terminal. AutoGetCustomerInfo=0 #TerminalReady is used to signal that the terminal is reday for a new transaction TerminalReady=0 #DisplayTextID will enable the Display Text with Unique Text ID UseDisplayTextID=0 #UseExtendedLocalMode will enable ExtendedLocalMode UseExtendedLocalMode=1 AlwaysUseTotalAmountInExtendedLM=1 # UseJoinDisplayText will enable splitting Terminal lines into separate DisplayTexts UseSplitDisplayText=0 # Use2KBuffer will enable 2k receive buffer in Baxi. Use2KBuffer=0 # DisplayTextInLocalMode enables displaytext messages in localmode DisplayTextInLocalMode=0 [TCPIPSERVER] BluetoothTunnel=0 SocketListener=0 SocketListenerPort=6001 -
Enable the Is main and Payment in use settings.
For more information about Payment Service settings, see Payment Service.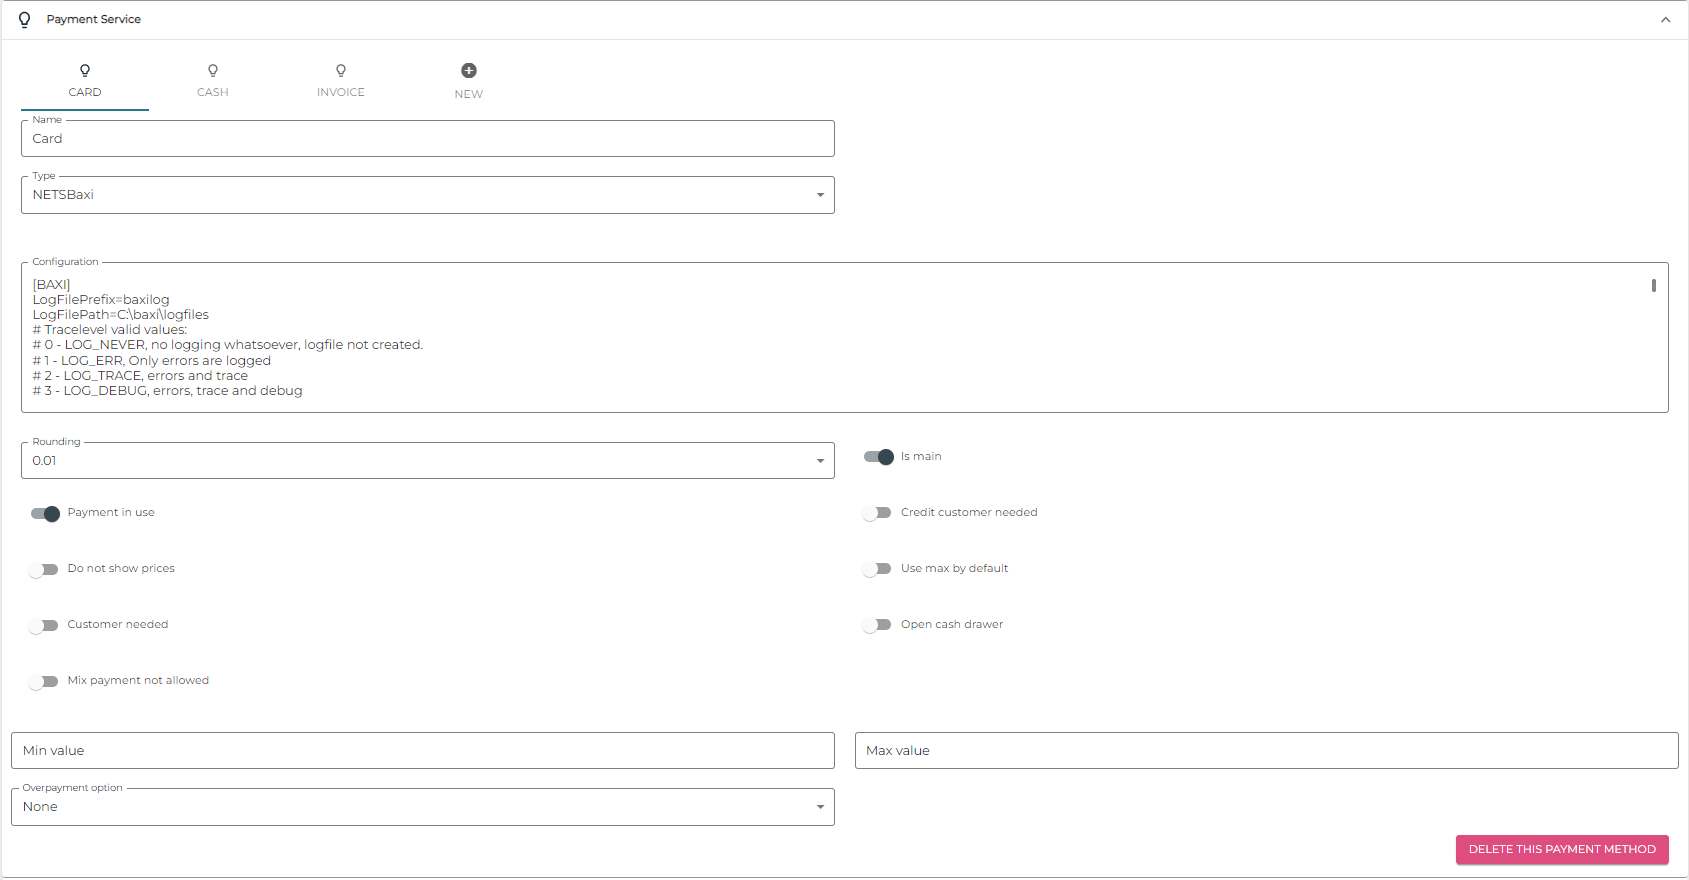
Payment Service settings
-
-
Click Save to save your settings.